


The cutting board is as simple as useful auxiliary device in any woodworking shop. Its construction is very simple and does not require special materials (scrap wood will be fine)
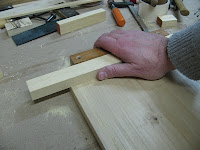 The main piece consists of a 1 inch thick board, 10" wide and 1 foot long. At both ends, on opposite sides, two square holders (1 1/4" x 1 1/4" section) are screwed and /or glued (of course these sizes can be customized as needed). While one is located on the backside and firmly holds the tool against the workbench edge, the other is on the top face and holds the workpiece in place during cutting.
 The cutting free hand (in my case the right one, more often the left one) will hold the workpiece firmly pressed against the support. At the same time this force will push the tool against the bench, blocking everything very efficiently.
  Using a free-hand cut, the cutting board, usually, is delegated in the preliminary stages of cutting job, remanding later the fine squaring process, but ......... surfing the net, I saw a Roy Underhill and Chris Schwarz video and..... I discovered a truly amazing trick which helps you to get a much better result. This method exploits the ability of the saw blade to reflect items, including the workpiece. If you look carefully, you will see how the blade may cause image distortion when it is out of square and how easy is, however, to place the saw in the right way just following the optical effect of mirror surface. Well ...... I tried it and really works!
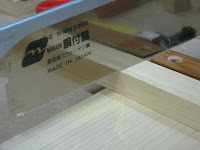
 Here are pictures of the first piece I just cut in this way without marking it. Only one cut dimension (first pic) is slightly out of square.
 The main piece consists of a 1 inch thick board, 10" wide and 1 foot long. At both ends, on opposite sides, two square holders (1 1/4" x 1 1/4" section) are screwed and /or glued (of course these sizes can be customized as needed). While one is located on the backside and firmly holds the tool against the workbench edge, the other is on the top face and holds the workpiece in place during cutting.
This holder is shorter than a couple of inches in respect to the tablet width, in order to provide room to the saw action (typically we will use a backsaw).
 The cutting free hand (in my case the right one, more often the left one) will hold the workpiece firmly pressed against the support. At the same time this force will push the tool against the bench, blocking everything very efficiently.
  Using a free-hand cut, the cutting board, usually, is delegated in the preliminary stages of cutting job, remanding later the fine squaring process, but ......... surfing the net, I saw a Roy Underhill and Chris Schwarz video and..... I discovered a truly amazing trick which helps you to get a much better result. This method exploits the ability of the saw blade to reflect items, including the workpiece. If you look carefully, you will see how the blade may cause image distortion when it is out of square and how easy is, however, to place the saw in the right way just following the optical effect of mirror surface. Well ...... I tried it and really works!
 Here are pictures of the first piece I just cut in this way without marking it. Only one cut dimension (first pic) is slightly out of square.
 Really promising!

No comments:
Post a Comment
Note: Only a member of this blog may post a comment.